Hello! This post is going to be a change of pace from my regular teaching/librarianship content. Since schools here are closed down, I have been out of work (other than a few hours a week of online teaching and tutoring). One of the many things I've been doing to keep busy is making masks for friends, family and community.
These masks have the following features:
-Ties at the back for adjustable fit
-Double-fold structure that creates a pocket into which a filter layer can be placed
-A wire over the bridge of the nose that can be shaped to fit the face and removed for machine washing
I find I can make a batch of about 10 of these in a day if I really focus. They are relatively comfortable (as far as masks go) and I feel they give better coverage than the medical masks. I feel fewer air gaps where droplets can get in or out. But be warned, they will make your face sweaty!
If you're wondering about why you should wear a mask and whether or not homemade masks are for you, I suggest visiting the CDC's information site about non-medical masks here: https://www.canada.ca/en/public-health/services/diseases/2019-novel-coronavirus-infection/prevention-risks/about-non-medical-masks-face-coverings.html
Now that you've decided to make your own masks, here's the method I've developed:
-Tightly woven cotton fabric (at least 18" x 15")
-Matching thread
-Sewing machine with universal needle
-Garden wire (See image below)
-Wire-cutters
-Scissors
-Sewing pins
-Safety pin
-Ruler
-Iron
-Ironing board
-Rotary cutter and self-healing mat (optional)
-Serger (optional)


2. Cut out 4 pieces of fabric that are 18" x 1.5". These will become the straps.

4. Sew the straps down the entire length about 3/8" from the edge.
5. Turn the straps inside out using a safety pin. This video shows what I find to be the easiest method of making and turning straps using a sewing machine:
Alternate method for making straps: I use a serger to make and turn straps using the method in the following video. I find it faster and easier when making large batches of straps.
6. Finish the short sides of the main mask piece. I serge the edges, but you can also use a zig-zag stitch. If you need some help with this, watch the video at this link.


9. Fold the nearest edge of the mask fabric over 5" from the edge. Place a pin on each side through the end of the strap and both layers of fabric. Place another pin near the end of the folded layer of fabric, aligning the edges, to keep it in place.

10. Place the other two straps just over 4" from the other end of the mask fabric. Similar to before, align one end of the strap with the long edge of the mask and bunch the rest of the strap up in the middle to keep it out of the way.

11. Fold the other edge of the mask fabric back over itself (and over the second set of straps) 4" from the edge. Place pins through the straps and both layers of fabric. Align the edges and place as many pins as necessary through all layers to keep it stable.

12: Sew along both pinned edges 1/4" from the edge.

13: Turn the mask right side out and iron both the mask and straps flat. I sometimes don't bother with ironing, but it does make the finished product look much nicer.


15. Once the mask is in position, measure 1" up from the bottom edge and place a pin in the side of the mask. Place another pin every 1/2" until you have 9 pins total and the highest one is 1" from the top edge of the mask.

16. Do the same to the opposite side of the mask until you have 9 pins on each side of the mask, all 1/2" apart.

17. Take the bottom most pin and fold it up to meet the third pin from the bottom, creating a fold in the opposite direction in the location of the second pin. The video below shows how to do this:
Pin that fold in place. Similarly fold the 4th pin to meet the 6th and the 7th pin to meet the 9th until you have three folds on one side. Do the same on the opposite side. Remove the pins that marked the locations of the folds, just leaving enough pins to hold all the folds in place.

18. Sew each side, through all the folds, 1/2" from the edge.


20. Sew in between the two pins, 5/8" from the top edge of the mask. You should be sewing two layers together.

21. Cut a 4" length of garden wire using the wire cutters.


And you're done! Once the wire is in place, you can cut out and place a filter material of your choice in between the folds of the fabric, or just wear the mask as-is. There are already 3 layers of fabric, which will keep most droplets from getting out.

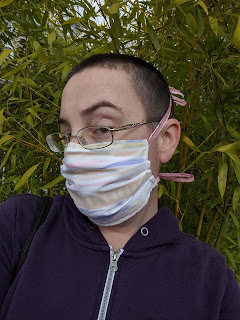
To wear the mask, tie the top two ties behind the head and the bottom two at the back of the neck.


These masks have the following features:
-Ties at the back for adjustable fit
-Double-fold structure that creates a pocket into which a filter layer can be placed
-A wire over the bridge of the nose that can be shaped to fit the face and removed for machine washing
I find I can make a batch of about 10 of these in a day if I really focus. They are relatively comfortable (as far as masks go) and I feel they give better coverage than the medical masks. I feel fewer air gaps where droplets can get in or out. But be warned, they will make your face sweaty!
If you're wondering about why you should wear a mask and whether or not homemade masks are for you, I suggest visiting the CDC's information site about non-medical masks here: https://www.canada.ca/en/public-health/services/diseases/2019-novel-coronavirus-infection/prevention-risks/about-non-medical-masks-face-coverings.html
Now that you've decided to make your own masks, here's the method I've developed:
Non-Medical Mask: Materials
To make these masks you will need:-Tightly woven cotton fabric (at least 18" x 15")
-Matching thread
-Sewing machine with universal needle
-Garden wire (See image below)
-Wire-cutters
-Scissors
-Sewing pins
-Safety pin
-Ruler
-Iron
-Ironing board
-Rotary cutter and self-healing mat (optional)
-Serger (optional)

Non-Medical Mask: Instructions
Cutting out fabric
1. Cut out one piece of fabric that is 15" x 9". This will become the main part of the mask.
2. Cut out 4 pieces of fabric that are 18" x 1.5". These will become the straps.

Making straps
3. Fold the straps in half lengthwise with the right side of the fabric facing in.4. Sew the straps down the entire length about 3/8" from the edge.
5. Turn the straps inside out using a safety pin. This video shows what I find to be the easiest method of making and turning straps using a sewing machine:
Putting it together
Some people iron the straps flat before putting the pieces together, but I don't bather. I iron the whole thing together at a later point.6. Finish the short sides of the main mask piece. I serge the edges, but you can also use a zig-zag stitch. If you need some help with this, watch the video at this link.

7. Lay your main mask piece of fabric down with the right side facing up. I find this easiest to do on a cutting mat because you will need to place the straps at specific lengths down the long edge of the mask.
8. Place a strap on each of the long sides of the mask fabric just over 5" from one of the edges. One raw edge of each strap will be even with (or just over) the edge of the fabric. Wind, fold, or bunch up the rest of the length of the strap so that it is sitting in the middle of the mask fabric and not extending over the edges anywhere.

9. Fold the nearest edge of the mask fabric over 5" from the edge. Place a pin on each side through the end of the strap and both layers of fabric. Place another pin near the end of the folded layer of fabric, aligning the edges, to keep it in place.

10. Place the other two straps just over 4" from the other end of the mask fabric. Similar to before, align one end of the strap with the long edge of the mask and bunch the rest of the strap up in the middle to keep it out of the way.

11. Fold the other edge of the mask fabric back over itself (and over the second set of straps) 4" from the edge. Place pins through the straps and both layers of fabric. Align the edges and place as many pins as necessary through all layers to keep it stable.

12: Sew along both pinned edges 1/4" from the edge.

13: Turn the mask right side out and iron both the mask and straps flat. I sometimes don't bother with ironing, but it does make the finished product look much nicer.

Making pleats
14. The exposed edge of fabric is going to be on the bottom inside of the finished mask. Position the mask so that the outside is facing towards you and the mask is right-side up. This image shows the exposed edge so that you can identify the bottom, but you will flip the mask over from this view while making the pleats.
15. Once the mask is in position, measure 1" up from the bottom edge and place a pin in the side of the mask. Place another pin every 1/2" until you have 9 pins total and the highest one is 1" from the top edge of the mask.

16. Do the same to the opposite side of the mask until you have 9 pins on each side of the mask, all 1/2" apart.

17. Take the bottom most pin and fold it up to meet the third pin from the bottom, creating a fold in the opposite direction in the location of the second pin. The video below shows how to do this:
Pin that fold in place. Similarly fold the 4th pin to meet the 6th and the 7th pin to meet the 9th until you have three folds on one side. Do the same on the opposite side. Remove the pins that marked the locations of the folds, just leaving enough pins to hold all the folds in place.

18. Sew each side, through all the folds, 1/2" from the edge.

Almost Done! Adding the Wire
19. Along the top of the mask, place a pin 2" from each edge.
20. Sew in between the two pins, 5/8" from the top edge of the mask. You should be sewing two layers together.

21. Cut a 4" length of garden wire using the wire cutters.

22. Lift the fold on the back of the mask to insert the wire at the top edge of the mask. It will be placed in between the top edge and the final line of sewing you did at the end.

And you're done! Once the wire is in place, you can cut out and place a filter material of your choice in between the folds of the fabric, or just wear the mask as-is. There are already 3 layers of fabric, which will keep most droplets from getting out.

To wear the mask, tie the top two ties behind the head and the bottom two at the back of the neck.

Stay safe and happy sewing!
Comments
Post a Comment